Không có sản phẩm trong giỏ hàng!

SKds40A + dsPIC30F4013 Library
- Idris Zainal Abidin
- 06 Mar 2015
- 503
Hi guys, which do you prefer between 5V logic or 3.3V logic microcontroller? I believe that 5V logic is much more popular among students, beginner and hobbyist. However when you want to go with advance microcontroller, it doesn't support 5V logic microcontroller. So, what is the most advance microcontroller with 5V logic? In PIC series, 16-bit dsPIC30F family is a most advance for 5V logic microcontroller. We also sell SKds40A as a starter kit for 16-bit 40 pins. You can program the PIC chip using UIC00B. Since it is lack of library and hard to start, I have decided to develop a basic function for dsPIC30F4013 (with CIKU function style), and today I want to share with you. :)
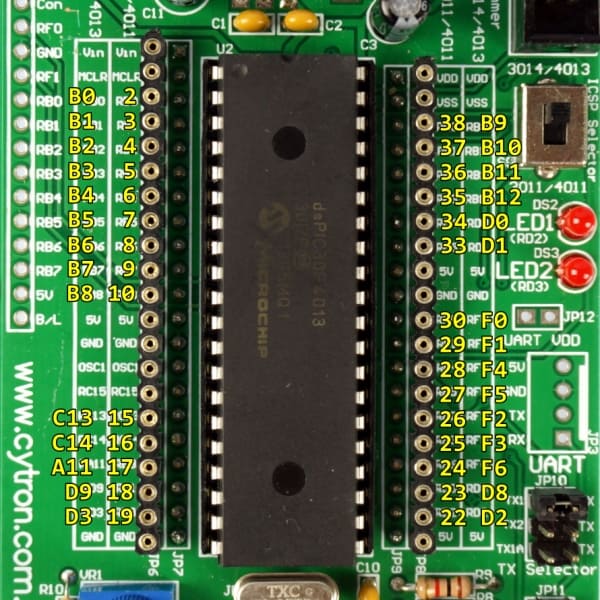
List of dsPIC30F4013 pins Before we proceed to the library function, you should know the pin arrangement first.
 For all digital function, you can use all the available pins (yellow font) on the picture above. Please note, there have two style to write, either you enter the pin number OR pin name, for example pinMode(2, OUTPUT); or pinMode(B0, OUTPUT);.
Analog Pins *You can use these pins with analogRead function. 1. B0 - 2 2. B1 - 3 3. B2 - 4 4. B3 - 5 5. B4 - 6 6. B5 - 7 7. B6 - 8 8. B7 - 9 9. B8 - 10 10. B9 - 11 11. B10 - 12 12. B11 - 13 13. B12 - 14
PWM Pins *You can use these pins with analogWrite function. 1. D0 - 34 2. D1 - 33 3. D2 - 22 4. D3 - 19
Serial Pins *You can use these pins with Serial function. 1. F2 - 26 (Receive) 2. F3 - 25 (Transmit)
Serial2 Pins *You can use these pins with Serial2 function. 1. F4 - 28 (Receive) 2. F5 - 27 (Transmit)
User Interface Pins *In SKds40A, there have 2 programmable LEDs and 2 switches. You can use the following name to program (refer to example section). 1. LED1 - 22 2. LED2 - 19 3. SW1 - 17 4. SW2 - 23
List of function This is the list of basic function. If you're familiar with CIKU library, then it is easy for you. The concept is same.
[code lang="c" highlight=""]// mode: INPUT or OUTPUT pinMode(pin, mode); // value: HIGH or LOW digitalWrite(pin, value); // return: HIGH or LOW digitalRead(pin); // Toggle the pin state digitalToggle(pin); // value: 0 to 100 analogWrite(pin, value); // return: 0 to 4096 analogRead(pin); // return: current milliseconds millis(); // return: current microseconds micros(); // ms: number of milliseconds to pause delay(ms); // us: number of microseconds to pause delayMicroseconds(us); // frequency: tone's frequency in hertz // duration: tone's duration tone(pin, frequency, duration); // baudrate: baudrate speed, e.g 9600 Serial_begin(baudrate); // return: number of serial data available to read Serial_available(); // return: 1 byte serial data Serial_read(); // value: 1 byte serial data Serial_write(value); // string: e.g "Hello World" Serial_printString(string); // value: number to be displayed // base: BIN, OCT, DEC, HEX Serial_printNumber(value, base); [/code]
*For the 2nd serial pin function, you can replace the Serial to Serial2 (Serial2_begin). **You can use both serial function at the same time.
Example This is example provided in template.c file. User can edit this file.
[code lang="c" highlight=""]#include "Arduino.h" void setup() { pinMode(LED1, OUTPUT); pinMode(LED2, OUTPUT); pinMode(SW1, INPUT); pinMode(SW2, INPUT); } void loop() { if(digitalRead(SW1) == LOW) { digitalWrite(LED1, HIGH); digitalWrite(LED2, LOW); while(digitalRead(SW1) == LOW); delay(100); } else if(digitalRead(SW2) == LOW) { digitalWrite(LED1, LOW); digitalWrite(LED2, HIGH); while(digitalRead(SW2) == LOW); delay(100); } }[/code]
Download You can download the library HERE.
Thank you Hope this tutorial can help your project development, and don't forget to share your project with us! :)
 International
 Singapore
 Malaysia
 Thailand
 Vietnam